
Ten Commandments of ROM Flashing ROMs before CyanogenMod LineageOS
Smartphone model: "xt907", "Droid Razr M", "Razr M", and "msm8960" (Note: the "Razr HD" device is similar enough to the "Razr M" that you're generally okay with files for that device as well)
Android version: "KitKat", "KK", "4.4.2"
~ ~ ~ ~ ~ ~ ~ ~ ~ ~ ~ ~ ~ ~ ~ ~ ~ ~ ~ ~ ~ ~ ~ ~ ~ ~ ~
WARNING: THE FOLLOWING GUIDE IS ONLY FOR VERIZON WIRELESS U.S. DROID RAZR MSMARTPHONES RUNNING ANDROID KitKat VERSION 4.4.2 (see Settings > About Phone). I CANNOT BE HELD RESPONSIBLE FOR ANYTHING THAT GOES WRONG IN THE PROCESS OF FOLLOWING THIS TUTORIAL. USING YOUR DEVICE IN THE WAYS DESCRIBED BELOW WILLVOID YOUR WARRANTY. PROCEED AT YOUR OWN RISK.
Okay, if you've made it this far you're pretty committed to doing this. So, without further ado:
A. Gain root access (similar to "jailbreak" on iOS devices)
1. On your phone, go to Settings > Security & Screen Lock
2. Check Unknown sources and (if exists) uncheck Verify apps (click OK on any security prompts)
3. If Settings > Developer options doesn't exist, go to Settings > About Phone and scroll down to the bottom. Tap Build number seven times to enable developer mode
4. Go to Settings > Developer options, enable it if disabled, and check USB debugging
 5. Open a web browser and download towelroot: https://tinyurl.com/khf62jr [mirror] {credit: geohot}
6. Click OK on the security warning to download.
7. Go to your phone apps and click on Downloads
8. Click on tr.apk and click Install and then Open
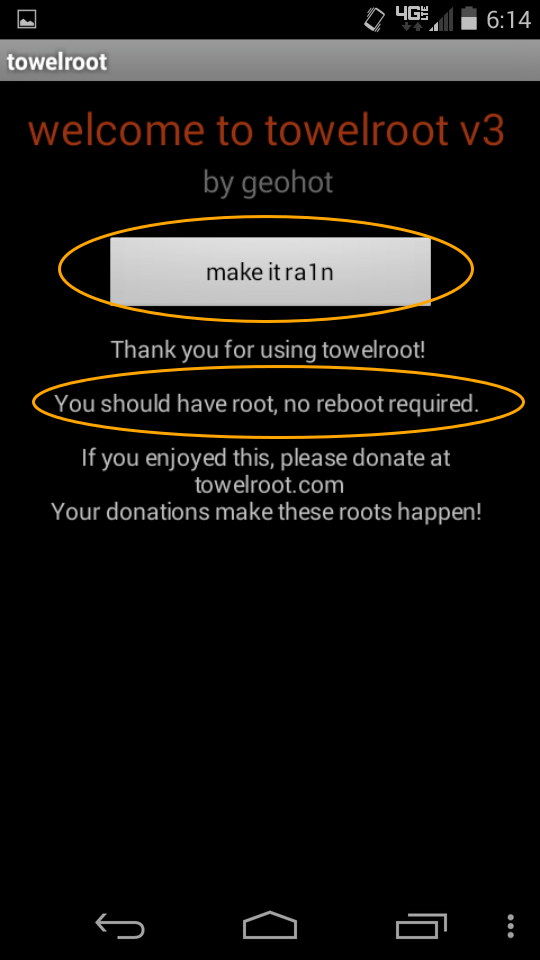
9. Click on the make it ra1n button. You should now have root access!
 10. Open a web browser and download Root Checker: https://tinyurl.com/ppg9cj7 {credit: CMDann}
11. Click the Verify Root Access button and make sure a green checkmark appears
 12. On your phone, go to Settings > Location and turn Location ON (say Yes to any prompts that appear)
13. Open a web browser and download GPS Test: https://tinyurl.com/puwhtue {credit: Chartcross Limited} and wait until "Accuracy (feet)" is greater than 0 (may take a few minutes; faster if you're outside with a clear view of the sky). Note: this is NOT an optional step. Activating GPS prior to flashing the ROM is required (see explanation here).
14. Congratulations, you're ready for the next phase!
2. Click OK on the security warning to download.
3. Go to your phone apps and click on Downloads
4. Click on Motopocalypse.apk and click Install and then Open
8. Click on the Unlock Bootloader button.
 9. Hold your power button and select Power off to turn off your phone.
10. Wait a few seconds for your phone to restart (if it doesn't, hold your power button down until it starts). Your phone should display this message:
 11. Congratulations, you're ready for the next phase!
Windows / Mac
2. Connect your phone using the manufacturer cable (see Commandment #8) and make sure the device is recognized and you can browse the phone contents.
3. Congratulations, you're ready for the next phase!
1. Hold down power, volume up, and volume down buttons simultaneously. When the device powers off, let go of the power button but keep holding down the volume up and volume down buttons until the bootloader screen appears.
2. Quickly press the volume down button until AP Fastboot is highlighted and then press the volume up key.
3. The screen should now be in fastboot mode and should say Device is UNLOCKED. Status Code:3. At the bottom of the screen it should say usb connected

4. On your PC, download the Motorola version of fastboot (see Commandment #9) {credit: mattlgroff}
5. Extract the fastboot file for your operating system to somewhere in your PATH. For example, on Linux:
chmod +x fastboot
sudo mv fastboot /usr/bin/6. Open a terminal command prompt and type fastboot devices
7. You should see something like {SERIAL NUMBER} fastboot
8. On your PC, download the Razr HD/M Recovery image: http://goo.gl/keFZNy [mirror] {credit: dhacker29} Update: some individuals have reported issues with installing the latest version of CM11 using the Clockworkmod (CWM) recovery mentioned in this step. If you have trouble, try using the Team Win (TWRP) recovery image (TWRP-2.7.0.0-moto_msm8960-hdpi.img) instead: http://d-h.st/nw4 {credit: dhacker29}
9. In a terminal command prompt, browse to where the image file is located and then type fastboot flash recovery CWM6049-RAZR-HD_M-KITKAT.img
10. Hold down power, volume up, and volume down buttons simultaneously. When the device powers off, let go of the power button but keep holding down the volume up and volume down buttons until the bootloader screen appears.
11. Quickly press the volume down button until Recovery is highlighted and then press the volume up key.
12. Your phone will boot into recovery mode:
 13. Congratulations, you're ready for the next phase!
1. Connect your phone to your PC via the USB cable and browse to the SD card
2. On your PC, download the latest CyanogenMod snapshot with JellyBean bootloader
3. On your PC, download the desired Google Apps 4.4.4 image (I prefer the "Micro Modular" package)
4. On your PC, download the stock Motorola boot logo image: http://goo.gl/YYmG2f [mirror] {credit: aviwdoowks}
5. Copy the zip files from steps 2-4 to your phone's SD card
6. Unplug the USB cable from your PC
7. Hold down power, volume up, and volume buttons down simultaneously. When the device powers off, let go of the power button but keep holding down the volume up and volume down buttons until the bootloader screen appears.
8. Quickly press the volume down button until Recovery is highlighted and then press the volume up key.
9. Once your phone boots into recovery mode, use your volume down button to highlight wipe data/factory reset then press your power button to select it
10. Use your volume down button to highlight Yes - Wipe all user data then press your power button to select it
11. Use your volume down button to highlight advanced then press your power button to select it
12. Use your volume down button to highlight wipe dalvik cache then press your power button to select it
13. Use your volume down button to highlight Yes - Wipe Dalvik Cache then press your power button to select it
14. Use your volume down button to highlight +++Go Back+++ then press your power button to select it
15. Use your volume down button to highlight install zip then press your power button to select it
16. Use your volume down button to highlight choose zip from /storage/sdcard1 then press your power button to select it
17. Use your volume down button to highlight stock.boot.logo.flashable.zip then press your power button to select it
18. Use your volume down button to highlight Yes - install ... then press your power button to select it
19. Use your volume down button to highlight choose zip from /storage/sdcard1 then press your power button to select it
20. Use your volume down button to highlight cm-11-2014... then press your power button to select it
21. Use your volume down button to highlight Yes - install ... then press your power button to select it
22. Use your volume down button to highlight choose zip from /storage/sdcard1 then press your power button to select it
23. Use your volume down button to highlight pa_gapps-modular... then press your power button to select it
24. Use your volume down button to highlight Yes - install ... then press your power button to select it
25. Use your volume down button to highlight +++Go Back+++ then press your power button to select it
26. Make sure reboot system now is highlighted, then press your power button to select it
27. Your phone will reboot, the Motorola logo will now display (instead of the annoying "Bootloader Unlocked" nag screen), and CyanogenMod will begin loading. Be patient -- may take up to 10 minutes to load for the first time.
 Congratulations, you've installed CyanogenMod on your Razr M!
Note: If CyanogenMod doesn't load after 10 minutes or you run into any other problems (e.g. bootloop, etc.), you can always start over by re-flashing your device back to factory settings.
Smartphone model: "xt907", "Droid Razr M", "Razr M", and "msm8960" (Note: the "Razr HD" device is similar enough to the "Razr M" that you're generally okay with files for that device as well)
Android version: "KitKat", "KK", "4.4.2"
~ ~ ~ ~ ~ ~ ~ ~ ~ ~ ~ ~ ~ ~ ~ ~ ~ ~ ~ ~ ~ ~ ~ ~ ~ ~ ~
WARNING: THE FOLLOWING GUIDE IS ONLY FOR VERIZON WIRELESS U.S. DROID RAZR MSMARTPHONES RUNNING ANDROID KitKat VERSION 4.4.2 (see Settings > About Phone). I CANNOT BE HELD RESPONSIBLE FOR ANYTHING THAT GOES WRONG IN THE PROCESS OF FOLLOWING THIS TUTORIAL. USING YOUR DEVICE IN THE WAYS DESCRIBED BELOW WILLVOID YOUR WARRANTY. PROCEED AT YOUR OWN RISK.
Okay, if you've made it this far you're pretty committed to doing this. So, without further ado:
A. Gain root access (similar to "jailbreak" on iOS devices)
1. On your phone, go to Settings > Security & Screen Lock
2. Check Unknown sources and (if exists) uncheck Verify apps (click OK on any security prompts)

6. Click OK on the security warning to download.
7. Go to your phone apps and click on Downloads
8. Click on tr.apk and click Install and then Open
9. Click on the make it ra1n button. You should now have root access!

11. Click the Verify Root Access button and make sure a green checkmark appears

13. Open a web browser and download GPS Test: https://tinyurl.com/puwhtue {credit: Chartcross Limited} and wait until "Accuracy (feet)" is greater than 0 (may take a few minutes; faster if you're outside with a clear view of the sky). Note: this is NOT an optional step. Activating GPS prior to flashing the ROM is required (see explanation here).
14. Congratulations, you're ready for the next phase!
B. Unlock the Bootloader
1. Open a web browser and download Moto-pocalypse: http://goo.gl/ioGJDo [mirror] {credit: djrbliss}2. Click OK on the security warning to download.
3. Go to your phone apps and click on Downloads
4. Click on Motopocalypse.apk and click Install and then Open
8. Click on the Unlock Bootloader button.

10. Wait a few seconds for your phone to restart (if it doesn't, hold your power button down until it starts). Your phone should display this message:

C. Install device drivers
1. On your PC, download the latest Motorola drivers:Windows / Mac
2. Connect your phone using the manufacturer cable (see Commandment #8) and make sure the device is recognized and you can browse the phone contents.
3. Congratulations, you're ready for the next phase!
D. Install custom Recovery image
1. Hold down power, volume up, and volume down buttons simultaneously. When the device powers off, let go of the power button but keep holding down the volume up and volume down buttons until the bootloader screen appears.
2. Quickly press the volume down button until AP Fastboot is highlighted and then press the volume up key.
3. The screen should now be in fastboot mode and should say Device is UNLOCKED. Status Code:3. At the bottom of the screen it should say usb connected

4. On your PC, download the Motorola version of fastboot (see Commandment #9) {credit: mattlgroff}
5. Extract the fastboot file for your operating system to somewhere in your PATH. For example, on Linux:
chmod +x fastboot
sudo mv fastboot /usr/bin/6. Open a terminal command prompt and type fastboot devices
7. You should see something like {SERIAL NUMBER} fastboot
8. On your PC, download the Razr HD/M Recovery image: http://goo.gl/keFZNy [mirror] {credit: dhacker29} Update: some individuals have reported issues with installing the latest version of CM11 using the Clockworkmod (CWM) recovery mentioned in this step. If you have trouble, try using the Team Win (TWRP) recovery image (TWRP-2.7.0.0-moto_msm8960-hdpi.img) instead: http://d-h.st/nw4 {credit: dhacker29}
9. In a terminal command prompt, browse to where the image file is located and then type fastboot flash recovery CWM6049-RAZR-HD_M-KITKAT.img
10. Hold down power, volume up, and volume down buttons simultaneously. When the device powers off, let go of the power button but keep holding down the volume up and volume down buttons until the bootloader screen appears.
11. Quickly press the volume down button until Recovery is highlighted and then press the volume up key.
12. Your phone will boot into recovery mode:

Install CyanogenMod
1. Connect your phone to your PC via the USB cable and browse to the SD card
2. On your PC, download the latest CyanogenMod snapshot with JellyBean bootloader
3. On your PC, download the desired Google Apps 4.4.4 image (I prefer the "Micro Modular" package)
4. On your PC, download the stock Motorola boot logo image: http://goo.gl/YYmG2f [mirror] {credit: aviwdoowks}
5. Copy the zip files from steps 2-4 to your phone's SD card
6. Unplug the USB cable from your PC
7. Hold down power, volume up, and volume buttons down simultaneously. When the device powers off, let go of the power button but keep holding down the volume up and volume down buttons until the bootloader screen appears.
8. Quickly press the volume down button until Recovery is highlighted and then press the volume up key.
9. Once your phone boots into recovery mode, use your volume down button to highlight wipe data/factory reset then press your power button to select it
10. Use your volume down button to highlight Yes - Wipe all user data then press your power button to select it
11. Use your volume down button to highlight advanced then press your power button to select it
12. Use your volume down button to highlight wipe dalvik cache then press your power button to select it
13. Use your volume down button to highlight Yes - Wipe Dalvik Cache then press your power button to select it
14. Use your volume down button to highlight +++Go Back+++ then press your power button to select it
15. Use your volume down button to highlight install zip then press your power button to select it
16. Use your volume down button to highlight choose zip from /storage/sdcard1 then press your power button to select it
17. Use your volume down button to highlight stock.boot.logo.flashable.zip then press your power button to select it
18. Use your volume down button to highlight Yes - install ... then press your power button to select it
19. Use your volume down button to highlight choose zip from /storage/sdcard1 then press your power button to select it
20. Use your volume down button to highlight cm-11-2014... then press your power button to select it
21. Use your volume down button to highlight Yes - install ... then press your power button to select it
22. Use your volume down button to highlight choose zip from /storage/sdcard1 then press your power button to select it
23. Use your volume down button to highlight pa_gapps-modular... then press your power button to select it
24. Use your volume down button to highlight Yes - install ... then press your power button to select it
25. Use your volume down button to highlight +++Go Back+++ then press your power button to select it
26. Make sure reboot system now is highlighted, then press your power button to select it
27. Your phone will reboot, the Motorola logo will now display (instead of the annoying "Bootloader Unlocked" nag screen), and CyanogenMod will begin loading. Be patient -- may take up to 10 minutes to load for the first time.

Note: If CyanogenMod doesn't load after 10 minutes or you run into any other problems (e.g. bootloop, etc.), you can always start over by re-flashing your device back to factory settings.
Tags
custom recovery
custom rom
moto mini
recovery
root
xt907
xt907 custom
xt907 custom recovery
xt907 flash
xt907 recoery
xt907 rom
xt907 root